What should Ms. Milton consider when planning her room?
Page 5: Tips for Setting up Your Classroom
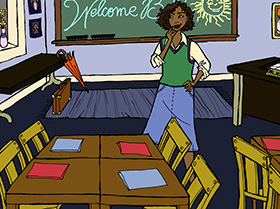 After reviewing the IEPs, and after talking with Evan and Emily, their parents, the TVI, and the O&M specialist, Ms. Milton realizes that she does not have to make major changes to her classroom. She has already arranged her classroom so that the desks are set up to facilitate group learning, which may also facilitate Evan’s and Emily’s participation in social and learning activities. However, Ms. Milton will need to make a few accommodations to the classroom arrangement.
Once a teacher has consulted all available resources, he or she needs to consider how to implement the necessary changes in the classroom to accommodate students with visual disabilities. Levack (1994) provides several guidelines for making decisions about accommodations for students with visual impairments.
| Functional Considerations | Guidelines for Accommodations |
| Visual ability | Students with different visual abilities may have distinctly different needs related to classroom arrangement.
Example: While Emily may be able to use her existing vision to navigate through a complex path of classroom furniture to her desk, Evan may benefit from a simpler, more straightforward furniture arrangement that allows him to walk in straight lines to reach his desk. |
| Level of restrictiveness | Teachers should use the accommodation that is closest to the natural environment and draws the least attention to the student, while still ensuring that the student is able to perform independently.
Example: Young children with visual disabilities may need a distinctive object or braille label placed on their storage cubbies to distinguish them from other students’ cubbies, while older students may not need any adaptation at all and may be able to locate their cubbies by learning their positions in relation to the others. |
| Cognitive ability | When children have cognitive limitations in addition to visual impairments, more extensive use of accommodations may be essential for them to perform tasks.
Example: A middle school student who is blind may only need a tactile map to become oriented and move independently within his or her school campus. But a student who also has cognitive limitations may require more extensive tactile guidelines and artificial landmarks to maintain orientation, sustain a straight line of travel, or find and recognize key destinations on the campus. |
Adapted from Levack (1994)
Ms. Milton reads in Evan’s and Emily’s IEPs that their desks should be located in the front of the room. For Emily, this is important so that she has a clear, unobstructed view of the teacher, chalkboard, and any visual presentations that Ms. Milton uses. In addition, the TVI recommends that Emily have a larger desk and be seated near an electrical outlet so that she will have room to use assistive equipment and technology. However, this doesn’t mean that her desk needs to be set apart from the other students’ desks. For Evan, even though he has no functional vision, seating near the front of the room easily allows for teacher assistance during lecture portions of the class.
Keep in Mind
In order for students to fully participate within the classroom and with their peers, it is important that students with visual disabilities aren’t physically separated from their peers because of their space or equipment needs. Consultation with the students, TVI, and O&M specialist will assist in providing the information that teachers need to determine the best seating placement for students with visual impairments.
Listen as Sharon Sacks discusses the importance of flexible seating for different classroom activities.
Sharon Sacks, PhD
Professor, CSU-LA Charter College of Education
Division of Special Education
(time: 0:30)

Transcript: Sharon Sacks, PhD
It’s important that the student be given opportunities to interact with other children. So I suggest that, when you’re doing seating arrangements, that the student move or be moved just like other students would be moved when you’re changing stations in the classroom. That helps the student get to know all the children in the classroom, and as long as you let the student know what the organization looks like, the physical organization looks like, and how you’re rearranging the classroom.
Click on the following links for simple tips and recommendations to keep in mind when setting up your classroom to include students with visual impairments. With the exception of the safety considerations, not all of the accommodations below will be necessary—or even appropriate—for all children with visual disabilities.
-
Providing additional contrast may enhance students’ ability to see items:
- The art table may be covered with dark butcher paper so it more easily stands out against a light floor surface.
- Covering students’ desks with butcher paper that highly contrasts the color of the other desks may make it easier for the students with low vision to see and locate their desks. Dark background paper may make it easier for students to locate lighter papers and items (or vice versa) on desks, tables, or counters.
- High-contrast shapes cut out of bold-colored paper can be placed in various locations to assist students with low vision in visually distinguishing drawers, cupboards, and doors.
- Dark letters and items on pale backgrounds are more easily viewed by students with visual impairments.
-
- “A place for everything and everything in its place” is a good motto to follow.
- When assigning lockers, shelves, or cubbies to students, remember that students with visual disabilities will have an easier time locating lockers that are on the ends of rows.
- Label shelves and items that the visually impaired students use:
- Braille labels: The TVI, braille transcriber, or paraprofessional can assist in making these for you, and older students can make their own labels.
- Large print labels
- Tactile symbols: For young children or children with additional disabilities, tactile symbols can be used. For example, adhering a familiar toy to the back of a child’s chair may help him or her distinguish it from other students’ chairs.
American Foundation for the Blind (2002)
-
- Place at students’ eye level, when possible.
- Use large, bold, high-contrast, and evenly spaced print. Avoid elaborate fonts, such as serif fonts.
- Use highly contrasting colors. Dark letters on a light background are easier for many students with low vision to see.
- Avoid “visual clutter.” Too much content on the bulletin board can make it difficult for students with low vision to isolate and see the important information.
- Items and wording placed in straight lines are easier to visually follow than are randomly placed and curved items.
- Use a clear sheet of braille overlay on print content on bulletin boards and other posted print materials. Make sure it is within hands’ reach.
- Consider incorporating interesting items for tactile exploration, such as art projects using materials of various shapes and textures.
- For other posted materials, such as classroom rules, routines, or procedures, consider making a braille or large-print copy for students with visual impairments to keep on their desks or in notebooks for easy review.
-
- Empty chairs should be pushed under desks.
- Doors should be either fully closed or pushed open against a wall.
- Cupboard doors and filing cabinet drawers should be closed when not in use.
- Eliminate or be sure to familiarize the students with potentially hazardous situations, such as
- Low obstacles (e.g., toys, trashcans)
- Obstacles protruding from the wall at head-level (e.g., pencil sharpeners, air conditioners, wall telephones)
- Changes in surface elevation (e.g., steps, slopes, thresholds)
- Carpets, rugs, and mats should be in good repair (no holes or turned up edges to trip on) and secured firmly to the floor.
- Place tactile, high-contrast visual warning strips of tape on the edge of steps or stairs or on the floor where there are other changes in surface elevation.
- Electrical cords should be kept out of students’ paths whenever possible, and securely covered when in pathways.
American Foundation for the Blind (2002)
-
- Make clear, uncluttered, straight pathways between desks and furniture groupings to key points in the room (e.g., exit, student’s desk, bookshelves).
- Minimize glare for students with low vision by arranging desks so that they aren’t facing a window.
- Try to keep furniture and materials that the students use in consistent places and be sure to let the students know when and where you’ve moved items.
- Place cubbies/shelves and coat-, backpack-, or cane-hooks near entrance and position for ease of locating (e.g., at the ends of rows for students with visual impairments).
- Provide larger desks, cubbies, shelf space, and/or lockers for braille materials or other devices the students use.
American Foundation for the Blind (2002)
-
Lighting needs and preferences vary from individual to individual. Some students with visual impairments prefer and benefit from lots of direct lighting, while others may be very sensitive to light. Many students with visual disabilities function well with plentiful, evenly distributed, glare-free light. It is best to consult with the TVI, student, and/or family regarding lighting preferences and needs. However, the following suggestions may be useful:
- Window shades with adjustable blinds allow for lots of light or reduction and redirection of light as needed.
- Floor lamps, desk lamps, or goose-necked lamps that can be clamped to the edge of tables and desks may provide needed additional lighting.
- Reduce problems with glare by 1) having students sit with their backs to the window so that lighting comes from behind, 2) covering shiny work surfaces (e.g., desk tops) with dark matte paper, or 3) using colored acetate paper or a glare-resistant computer screen.
- Avoid placing equipment in front of windows.
American Foundation for the Blind (2002)
Activity
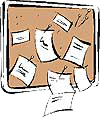
Because of Evan’s and Emily’s arrival, Ms. Milton is re-thinking the layout of her bulletin board on classroom rules. Click here to help Ms. Milton identify areas of concern.
- Identify three or four concerns relating to the layout/design of the following bulletin board for students with visual impairments.
- Then sketch out a new revised bulletin board for Ms. Milton that will address those concerns.
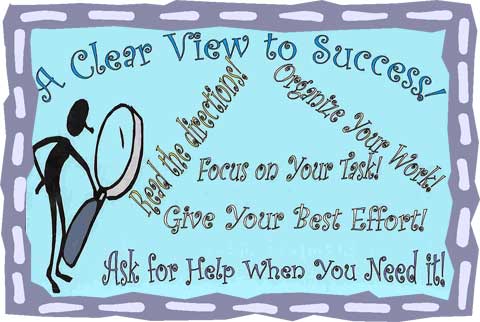
The bulletin board is laid out horizontally, and it is rectangular in shape. The background color is light blue. The border is a colorful, busy design. The heading is laid out in a horizontal arc and states “A Clear View to Success!” in a large, curly font in a darker blue. On the left side of the bulletin board is a very large picture of a screen beanie holding a large magnifying glass. In front of the screen beanie-and taking up the rest of the bulletin board-are five statements written in a large but narrow curly font that are laid out in a variety of directions within close proximity to one another. The statements include 1) Read the Directions! 2) Organize Your Work! 3) Focus on Your Task! 4) Give Your Best Effort! 5) Ask for Help When You Need It!
- Font color is low-contrast (pastel font against pastel background)
- Font is very curly
- Phrases are written in arcs and angles
- Spacing between letters and phrases is too close
- Border is busy and visually “cluttered”
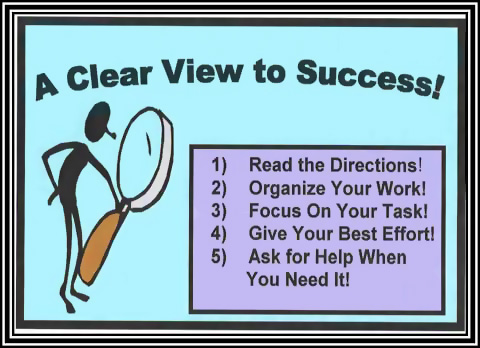
Changes include:
- Higher contrast font color against pale background
- Simpler font (not curly)
- Phrases organized horizontally
- Text highlighted in a text box with a different pale background color
- Even and increased spacing between letters and among phrases
- Simpler border with less distracting, less “cluttered” design
- Braille overlay can easily be placed on top of significant text for Evan to read