What should Ms. Milton consider when creating lesson plans to ensure the inclusion of Evan and Emily?
Page 7: Events Outside of the Classroom
 After learning about accommodations for the classroom, Ms. Milton has gained confidence in her ability to teach Evan and Emily, but she still has a few doubts and questions about activities or events outside of the classroom. Although these are natural concerns, Ms. Milton should be assured that many students with visual impairments learn to navigate independently both at school and in the community. The orientation and mobility (O&M) specialist can provide initial orientation within the school environment and also opportunities to practice these skills (referred to as travel skills) within the community.
Navigating the School Environment
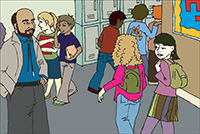 For students with visual disabilities, the school environment can at first be confusing to navigate. In particular, school cafeterias can prove crowded, noisy, and confusing environments. There are lines to manage; cups, utensils, and tables to find; and trays of food and drink to carefully balance. Another area that presents challenges is the hallway, especially during classroom changes. The O&M specialist helps students to master the necessary travel skills for such areas in the school.
Until students are fully familiar with the different aspects of the school environment, it is important to consider the following tips:
- Provide clear and specific verbal directions.
- Request that cafeteria staff alert the students to obstacles or changes in the locations of tables, trashcans, and other objects.
- Ask playground supervisors to keep an eye out for students with visual impairments in particularly hazardous areas, such as near the swings or at the bottom of the slide.
-
Click to hear Brenda Naimy describe how to use the human guide technique.

Brenda Naimy
Orientation and mobility department faculty
California State University, Los Angeles(time: 2:12)
Transcript: Brenda Naimy
I think it helps to think of human guide procedures as well-thought-out common sense. There are a few important things to keep in mind when guiding someone who’s visually impaired. But there’s nothing really complex about being a good guide.
It is a common mistake to assume that a guide is always wanted or needed. So it’s better to ask the visually impaired person if they’d like a guide. And, if they don’t already know who you are, it’s a good idea to identify yourself.
Another common error made by inexperienced guides is taking someone by the hand to lead them. As a rule, it’s important to avoid pulling or otherwise steering someone who’s visually impaired. It’s better to have them hold your arm and have them walk a step behind you so that they can follow your body movements. And while you’re walking, you do want to be sure to allow for enough clearance for the width of your bodies. If the area’s crowded or narrow, you can ask the person to move behind you or you can signal them by putting your arm behind your back. If you’re approaching any uneven sidewalk areas or unexpected slopes, you want to be sure to warn the person so that they can avoid stumbling. Similarly, whenever you approach stairs or curbs, you want to be sure to stop and tell the person before you proceed.
Another thing to keep in mind when guiding someone is that going through doors can be a little awkward if done incorrectly. As the guide, you want to open the door and lead going through it. It will go smoother if you ask the visually impaired person to assist you in holding the door open and pause and have them close it after you’ve both gone through.
And finally, when you’re getting ready to leave the person you’ve guided, you do want to be sure to leave them in contact with a chair or a wall so that they don’t feel like they’re left hanging in open space by themselves. And so they don’t experience a moment of embarrassment by talking to themselves, you want to let them know when you’re about to walk away. Just a brief “see you later” will take care of that.
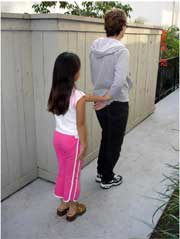
Human Guide Techniques
Human guide techniques enable an individual to safely escort a person with a visual impairment in unfamiliar surroundings. The orientation and mobility (O&M) specialist will be able to provide training in use of human guide techniques for students and adults in the classroom. Below you will find directions for basic human guide techniques.
Initiating contact
Ask the student if he or she would like to be guided. If the student does, touch the back of his or her hand so that the student can establish the proper grasp of the guide’s upper arm.
Proper Grasp
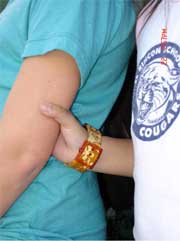
The student should grasp the guide’s upper arm, just above the elbow, with his or her fingers on the inside of the guide’s arm and the thumb on the outside. If the traveler is younger or smaller and cannot reach the guide’s arm, he or she may instead take hold of the guide’s wrist or even the index and middle fingers.
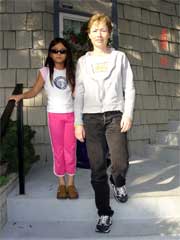
Proper Body Position

Both the guide and the student should hold their upper arms close to their bodies. This will automatically position the student one-half step behind the guide so that he or she can follow the guide’s body movements.
Changes in Surface or Elevation
The guide should offer verbal cues (descriptive information) whenever there are:
- Changes in ground surface, such as uneven sidewalk areas, slopes, or drop-offs (e.g., curbs, steps)
- Stairs
- Changes in direction
- Other irregularities that the student may encounter
Eventually, the guide and the student may be able to phase out the need for some verbal cues; however, it is better to err on the side of providing too much information as opposed to too little.
Stairs
 The guide should always approach stairs directly, never at an angle.
- The guide should stop at the edge of the first step and be sure to cue the student that he or she is approaching stairs. The guide should also let the student know whether he or she will be ascending or descending.
- The student may feel more comfortable if he or she is positioned to hold the handrail as he or she travels up or down the stairs.
- The guide should ascend or descend first, and the student should follow one step behind.
- When the guide reaches a landing (the top or bottom of the stairs), he or she should alert the student and then cue the student that there is one step left.
Narrow Areas
 When approaching a narrow area (e.g., a doorway, or crowded area), the guide should provide the student with a verbal cue (e.g., “It’s narrow here.”) When passing through the narrow area, the guide should move the arm the student is holding behind the guide’s back, thus directing the student to move directly behind the guide.
Doors
 Guides should keep in mind to alert students:
- That he or she is approaching a door
- How the door opens
- That the door opens “toward us” or “away from us”
- That the door opens “to the right” or “to the left”
The guide will need to open the door and enter first, and the student should follow through the door behind. When possible, the student should assist both in holding the door open and in closing it.
Preparing for Emergencies
Students with visual impairments should participate in all school emergency drills. If appropriate, additional one-on-one instruction from the O&M specialist may be provided until they are familiar with emergency procedures and escape routes from all areas of the school. In emergency situations, students with visual disabilities should be partnered with “emergency buddies” in each of their classrooms. The emergency buddy may be a classmate or an adult—depending on the age of the student—who will locate him or her during an emergency and use human guide techniques while following appropriate emergency procedures.
Travel Beyond the School Environment
When teachers make plans for field trips, they usually find it worthwhile to research the availability of accommodations for individuals who are visually impaired:
 Sites may have braille materials available on request.
- Museums may offer audio descriptions of their exhibits.
- Museums may allow visitors to touch and explore certain displays.
- Theatres may provide small, individual FM radio systems to allow listeners to hear descriptions of actions, body language, lighting, costumes, and scenery during pauses in the dialogue on stage.
Other accommodations that allow students with visual disabilities to fully participate in fieldtrip activities may include:
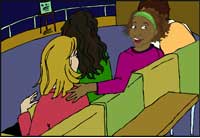 Securing seats near presentations, stages, and movie screens for easier viewing
- Ensuring an unobstructed view of the stage or screen so that students can use low-vision aids if needed
- Pairing with friends who can provide descriptive information as necessary
- Arriving early, before the lights are dimmed, for easier mobility
- Using a flashlight for additional illumination
- Orienting students to the environment prior to the event
- Using human guide techniques
Activity
Contact your school district’s O&M specialist or TVI and request an opportunity to walk with him or her while you wear a blindfold. Not only will you develop a better understanding of what it feels like to be guided but you will also likely become a more sensitive and careful guide.